
How To Clean A Turkey
Cleaning a turkey is a fundamental yet often overlooked aspect of preparing a delicious feast. At its core, cleaning a turkey is about hygiene and ensuring the best flavor and texture for your meal. This guide will delve into the intricate details of cleaning a turkey to perfection, providing you with step-by-step instructions and expert tips to elevate your culinary skills.
Importance of Proper Cleaning
Before delving into the cleaning process, it’s essential to understand why it matters. Properly cleaning a turkey removes any impurities, bacteria, or residue that may compromise the taste and safety of the final dish. Additionally, a well-cleaned turkey ensures even cooking, allowing for a moist and flavorful outcome.
Step 1: Preparing Your Workspace
The first step in cleaning a turkey is to set up a clean and organized workspace. Ensure that your countertop is thoroughly sanitized, and gather all necessary tools and ingredients, including mild dish soap, a large cutting board, paper towels, and a sink with running water.
Step 2: Removing the Packaging
Carefully remove the turkey from its packaging, taking care to avoid any splatter or cross-contamination. Place the turkey on the cutting board and discard the packaging promptly.
Step 3: Rinsing the turkey
Rinse the turkey thoroughly under cold running water, inside and out. Use your hands to remove any remaining ice or giblets from the cavity. Pat the turkey dry with paper towels, ensuring that the skin is completely moisture-free.
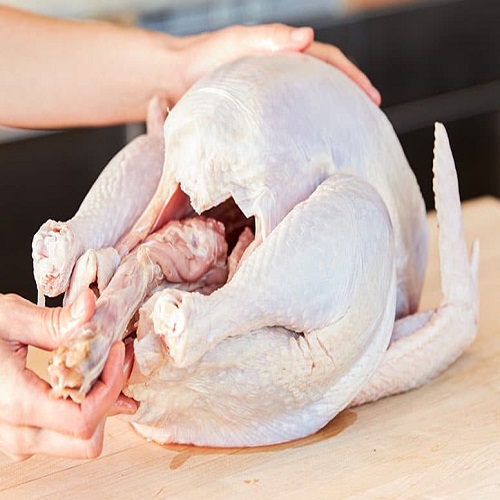
Step 4: Cleaning the Cavity
Inspect the cavity of the turkey and remove any remaining giblets, neck, or other internal organs. Rinse the cavity once more to ensure all debris is removed.
Step 5: Removing Excess Fat
Trim any excess fat from the turkey using a sharp knife or kitchen shears. Pay special attention to areas around the neck and cavity, as well as any visible fat deposits on the skin.
Step 6: Seasoning the Turkey
Once the turkey is cleaned and trimmed, it’s time to season it according to your recipe preferences. Whether you opt for a traditional blend of herbs and spices or a more exotic marinade, ensure that the seasoning is evenly distributed both inside and outside the turkey.
Step 7: Letting the Turkey Rest
Allow the seasoned turkey to rest at room temperature for at least 30 minutes before proceeding with your chosen cooking method. This resting period allows the flavors to meld and ensures a juicier result.
Expert Tips for Perfectly Cleaned Turkey
- Use gloves: Consider wearing food-safe gloves throughout the cleaning process to minimize direct contact with raw poultry and reduce the risk of contamination.
- Sanitize surfaces: Regularly sanitize your workspace, utensils, and hands to prevent the spread of bacteria.
- Invest in quality tools: High-quality knives, shears, and cutting boards can make the cleaning process more efficient and safer.
- Thoroughly dry the turkey: Moisture on the turkey’s skin can prevent proper browning during cooking, so ensure it is thoroughly dried before seasoning.
Conclusion
Mastering the art of cleaning a turkey is a crucial step towards creating a memorable dining experience for you and your loved ones. By following these detailed instructions and expert tips, you can ensure that your turkey is not only clean and safe to eat but also bursting with flavor and succulence. Embrace the process, experiment with seasoning, and savor the satisfaction of a job well done as you present your impeccably cleaned turkey to the table.
Related Posts

25 Best Restaurants in Temecula
Best Restaurants in Temecula, Temecula Valley Wine Country, with its…

Do Lemon Bars Need To Be Refrigerated
Lemon bars are a beloved dessert many enjoy for their…

Best restaurants in Chicago
Lula Cafe Address:2537 N Kedzie BlvdChicago60647Transport:El stop: Blue to Logan…